
When it’s 90 degrees in the shade and the mere thought of turning on the oven makes you shudder, it’s time to break out the no-bake dessert recipes. After all, chocolate is a food group to be enjoyed in all weathers!
-

- Gather the Ingredients
-
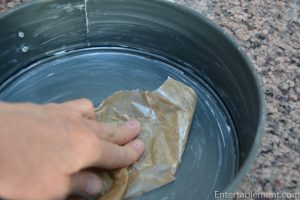
- Butter the Springform pan
-

- Add the chocolate wafers to the food processor
-
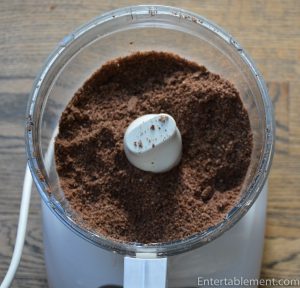
- Pulverize
-

- Add the butter
-

- Press the wafer mixture into the bottom of the springform pan and cover with clingfilm
-

- Chop the chocolate
-

- Put the chopped chocolate in a small bowl
-
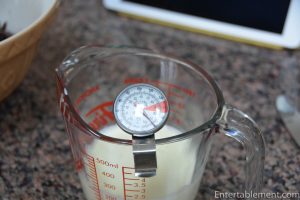
- Heat the cream
-
- Add the heated cream
-

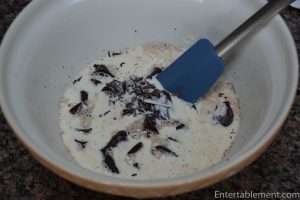
- Whisk the cream and chocolate until smooth
Making the chocolate shards was a blast. I had no idea this is how you made them. Fine Cooking has an excellent video here:
-

- Gather the tools for the chocolate shards
-

- Melt the chocolate
-
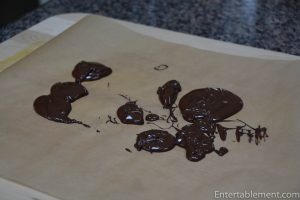
- Put the melted chocolate on the first sheet of parchment
-
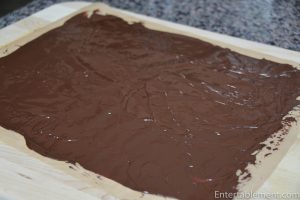
- Spread to within about 1″ of the edge
-

- Cover with another sheet of parchment
-

- Roll the “parchment sandwich” and place seam side down on a rimmed baking sheet

No-Bake Chocolate Mousse Pie
A decadent, delicious pie with only seven ingredients! No need to turn on the oven, either.
Ingredients
Scale
- 1 oz. (2 tbsp) unsalted butter, melted
- 8 oz Italian chocolate wafer sandwich cookies, such as Quadratini
- 13 oz semisweet chocolate; 9 oz chopped (about 1–1/2 cups) for mousse; 4 oz chopped for garnish
- 1 1/2 tsp pure vanilla extract
- pinch of kosher salt
- 3 3/4 cups heavy cream
- 2 tbsp confectioner’s sugar
Instructions
Making the Pie
- Butter a 9-inch springform pan.
- Grind the wafer cookies in a food processor until they resemble wet sand (20 to 30 seconds); you will have about 1 3/4 cups. Mix in the melted butter. Spread the crumbs in the pan, cover with plastic wrap, and press evenly into the bottom. Refrigerate.
- Combine the chocolate, 1/2 tsp of the vanilla, and the salt in a large bowl. Microwave 3/4 cup of the cream to 190 degrees (or heat in a pan to a bare simmer). Pour the cream over the chocolate, let sit for 1 minute, then whisk until smooth. Cover and refrigerate for about 15 minutes to cool, stirring occasionally.
- In a medium bowl, beat 1 1/2 cups of the cream with an electric mixer on medium-high speed until stiff peaks form (about 2 minutes). Whisk the chocolate mixture to loosen it, and fold it into the whipped cream with a large silicone spatula until no streaks remain.
- Carefully peel the plastic wrap off the crust. Scrape the mousse into the pan, gently spreading it to the edges. Cover and refrigerate for at least 6 hours.
- Just before serving, add the confectioner’s sugar and 1 tsp vanilla to the remaining 1 1/2 cups cream in a medium bowl. Beat with an electric mixer to medium-stiff peaks.
- Run a knife around the pie to loosen its edges and then carefully remove the side of the pan. Slide a spatula under the crust* and transfer the pie to a serving plate. Mound the whipped cream over the mousse and top with chocolate curls, shards, or shavings. To serve, dip a knife into hot water and dry it before slicing.
Making the garnish (chocolate shards)
- Melt the chocolate in a glass bowl placed inside a shallow pan of water. Be careful not to splash any water on the chocolate or it will seize.
- Using an offset spatula, spread the melted chocolate on a large piece of parchment paper (16 x 18″ or so). Be sure to wipe off the bottom of the bowl before starting to avoid any water getting into the chocolate. Cover the melted chocolate with another sheet of parchment paper and smooth it with your hands until the air is removed.
- Starting at one end, roll the parchment chocolate “sandwich” into a cylinder. Place the roll, seam side down, on a small rimmed baking pan and refrigerate until thoroughly chilled (about an hour).
- When you’re ready to garnish the pie, unroll the sheet and remove the top layer. The chocolate will melt very easily, so handle it quickly. Spread the shards over the whipped cream and voila!
Notes
- *Separating the crust from the pan bottom is not for the faint of heart. It’s challenging, but persevere and don’t be a sissy about it. The crust sticks to the bottom like nobody’s business, but it will shift with enough gentle pressure.
Nutrition
- Serving Size: 12

I’m sharing this post with Between Naps on the Porch.


Looks beautiful and the photos are terrific. I will be anxious to try this.
It may not have many ingredients, but you do use a lot of different pots! Chocolate everywhere 🙂 It’s really good, though. Worth it!
That is my kind of cooking, every pot, measuring spoon and mixing bowl in use. I thought the rolling up of the parchment/chocolate was very clever. I haven’t seen that done before.
Me either! I thought they shaved the chocolate from big blocks, but no. Neat, isn’t it? I’m always happy to learn something new 🙂
Excellent Valentines tread! I made it via recipe except I made a chocolate graham cracker crust instead of the cookies.
Thank you!
★★★★★
So glad you liked it, Elizabeth!